


Posted by Peter Glenn Staff on Sep 22nd 2025
Table of Contents:
The Short Answer: Here is a quick step-by-step for waxing skis.
- Clean ski base
- Select wax
- Heat wax
- Apply evenly
- Scrape and brush
- Test on snow
Ski waxing isn't just a maintenance task; it's the secret to unlocking your best performance on the slopes. Whether you're a beginner carving your first turns or a seasoned skier chasing powder, properly waxed skis can transform your entire mountain experience.
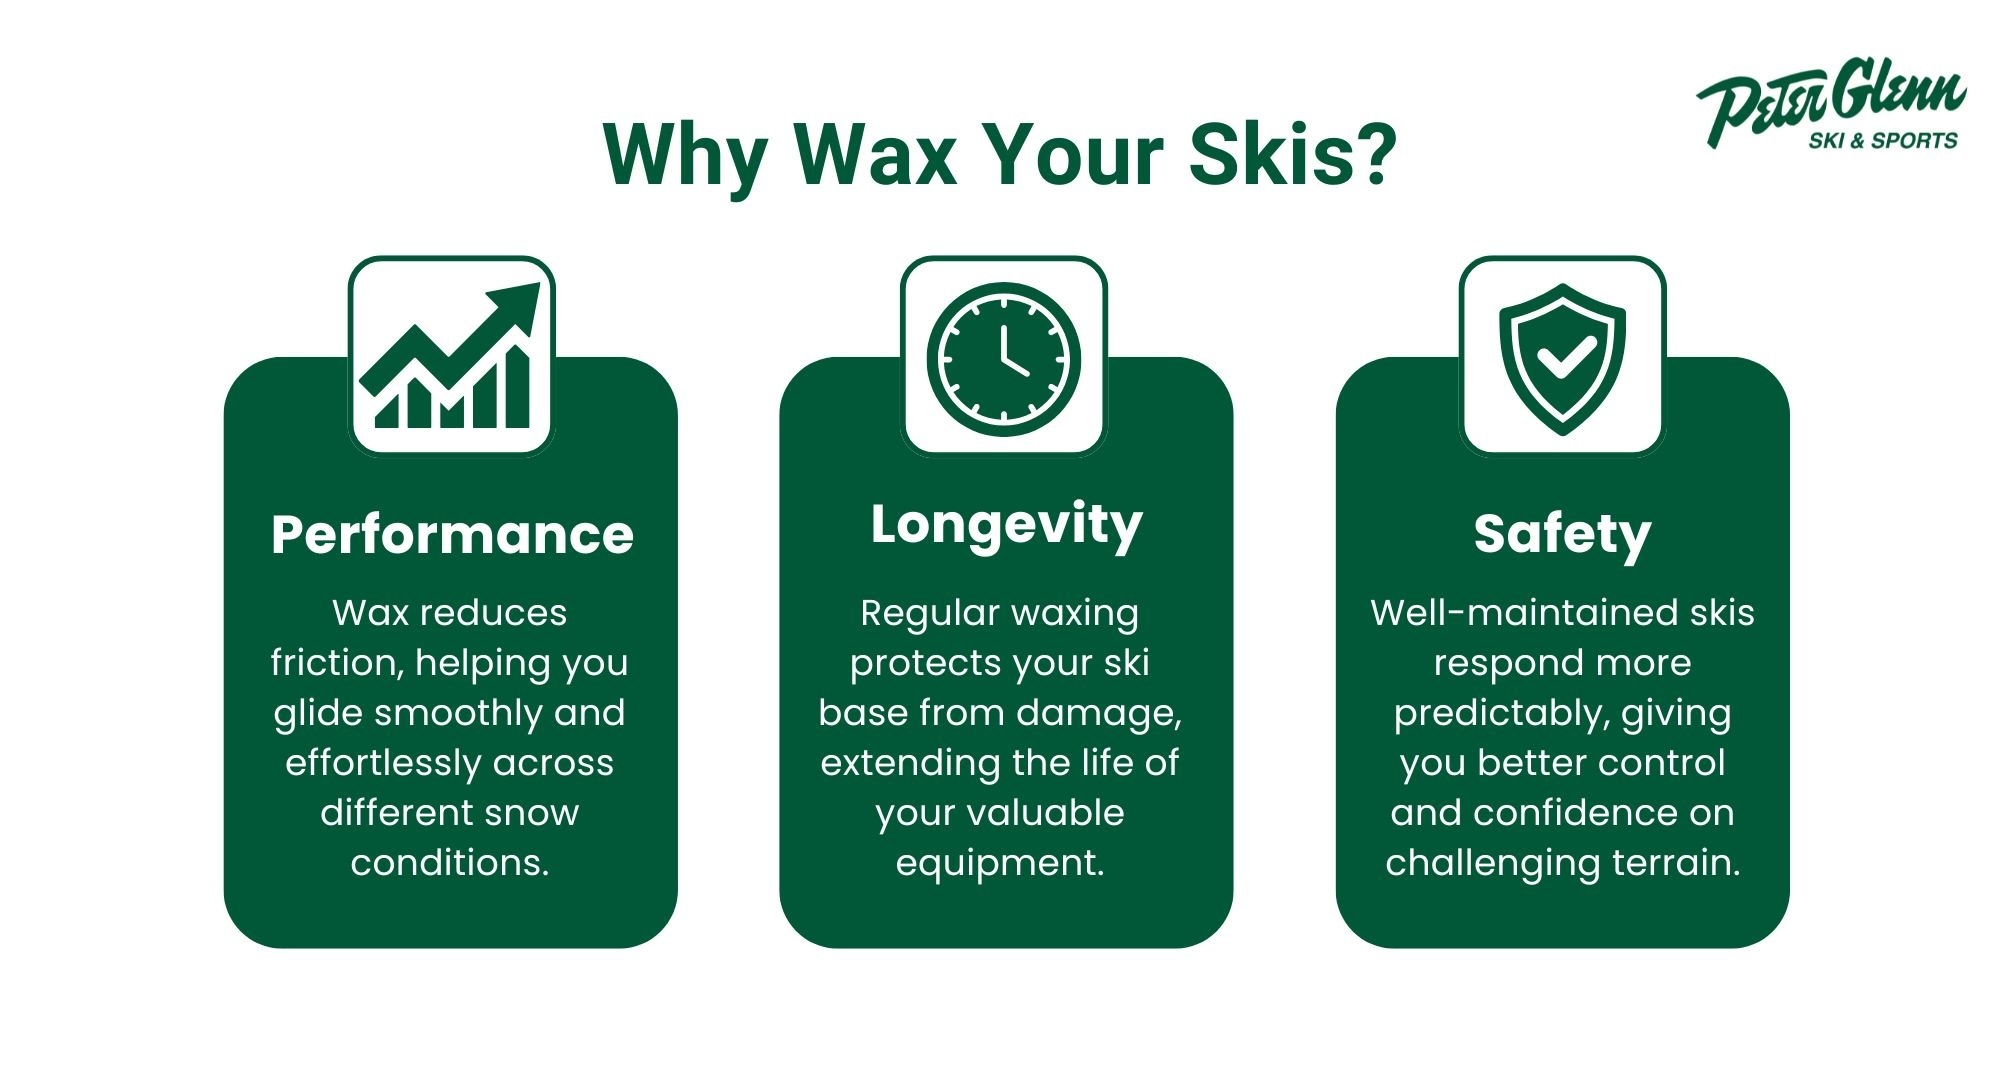
Why do skiers take waxing seriously? It's simple. Waxing directly impacts three critical aspects of skiing:
- Performance: Wax reduces friction, helping you glide smoothly and effortlessly across different snow conditions.
- Longevity: Regular waxing protects your ski base from damage, extending the life of your valuable equipment.
- Safety: Well-maintained skis respond more predictably, giving you better control and confidence on challenging terrain.
Disclaimer: For the most consistent results, professional waxing is always recommended. Expert technicians have the tools, training, and knowledge to apply the right wax for your skis and the snow conditions. This helps you avoid mistakes, extend ski life, and maximize performance. If you would rather leave it to the pros, Peter Glenn offers in-store ski waxing services to keep your gear slope-ready.
Getting Started: What You Need to Wax Skis
Essential Waxing Equipment
Preparing to wax your skis starts with gathering the right tools. The most critical piece of equipment is a ski-specific waxing iron. Unlike a household iron, these specialized tools provide precise temperature control and a flat surface designed to distribute wax evenly across your ski base.
Your core waxing toolkit should include:
- Wax iron
- Multiple types of wax
- Plastic wax scraper (wax remover)
- Assorted brushes
Professional ski technicians recommend investing in quality tools that will protect your ski base and improve your mountain performance. A good waxing iron might seem expensive, but it's a long-term investment that pays dividends in ski maintenance.
Wax and Brush Selection
Wax selection depends on your skiing conditions and goals. All-temperature wax works well for casual skiers who want a simple solution. More serious skiers often choose temperature-specific wax that matches exact snow conditions. Hot wax provides deeper penetration into the ski base, creating a more durable glide surface.
Brushes play a crucial role in the waxing process. Each type of brush serves a specific purpose:
- Nylon brushes for initial scraping
- Brass brushes for deep base cleaning
- Horsehair brushes for final polishing
Workspace Preparation
Proper workspace setup is crucial for an effective waxing session. Select a well-ventilated area with enough space to work comfortably. A stable surface is key. A vise is preferable, but a sturdy table can work in a pinch. Use rubber bands to pull up ski brakes, keeping them out of your way during the waxing process.
Extras like base cleaner, rubbing alcohol, and shop towels can help you achieve a professional-level wax job. Investing time in gathering the right equipment pays off on the mountain, protecting your ski investment and ensuring optimal performance across various snow conditions.
Waxing Skis: A Step-by-Step Process
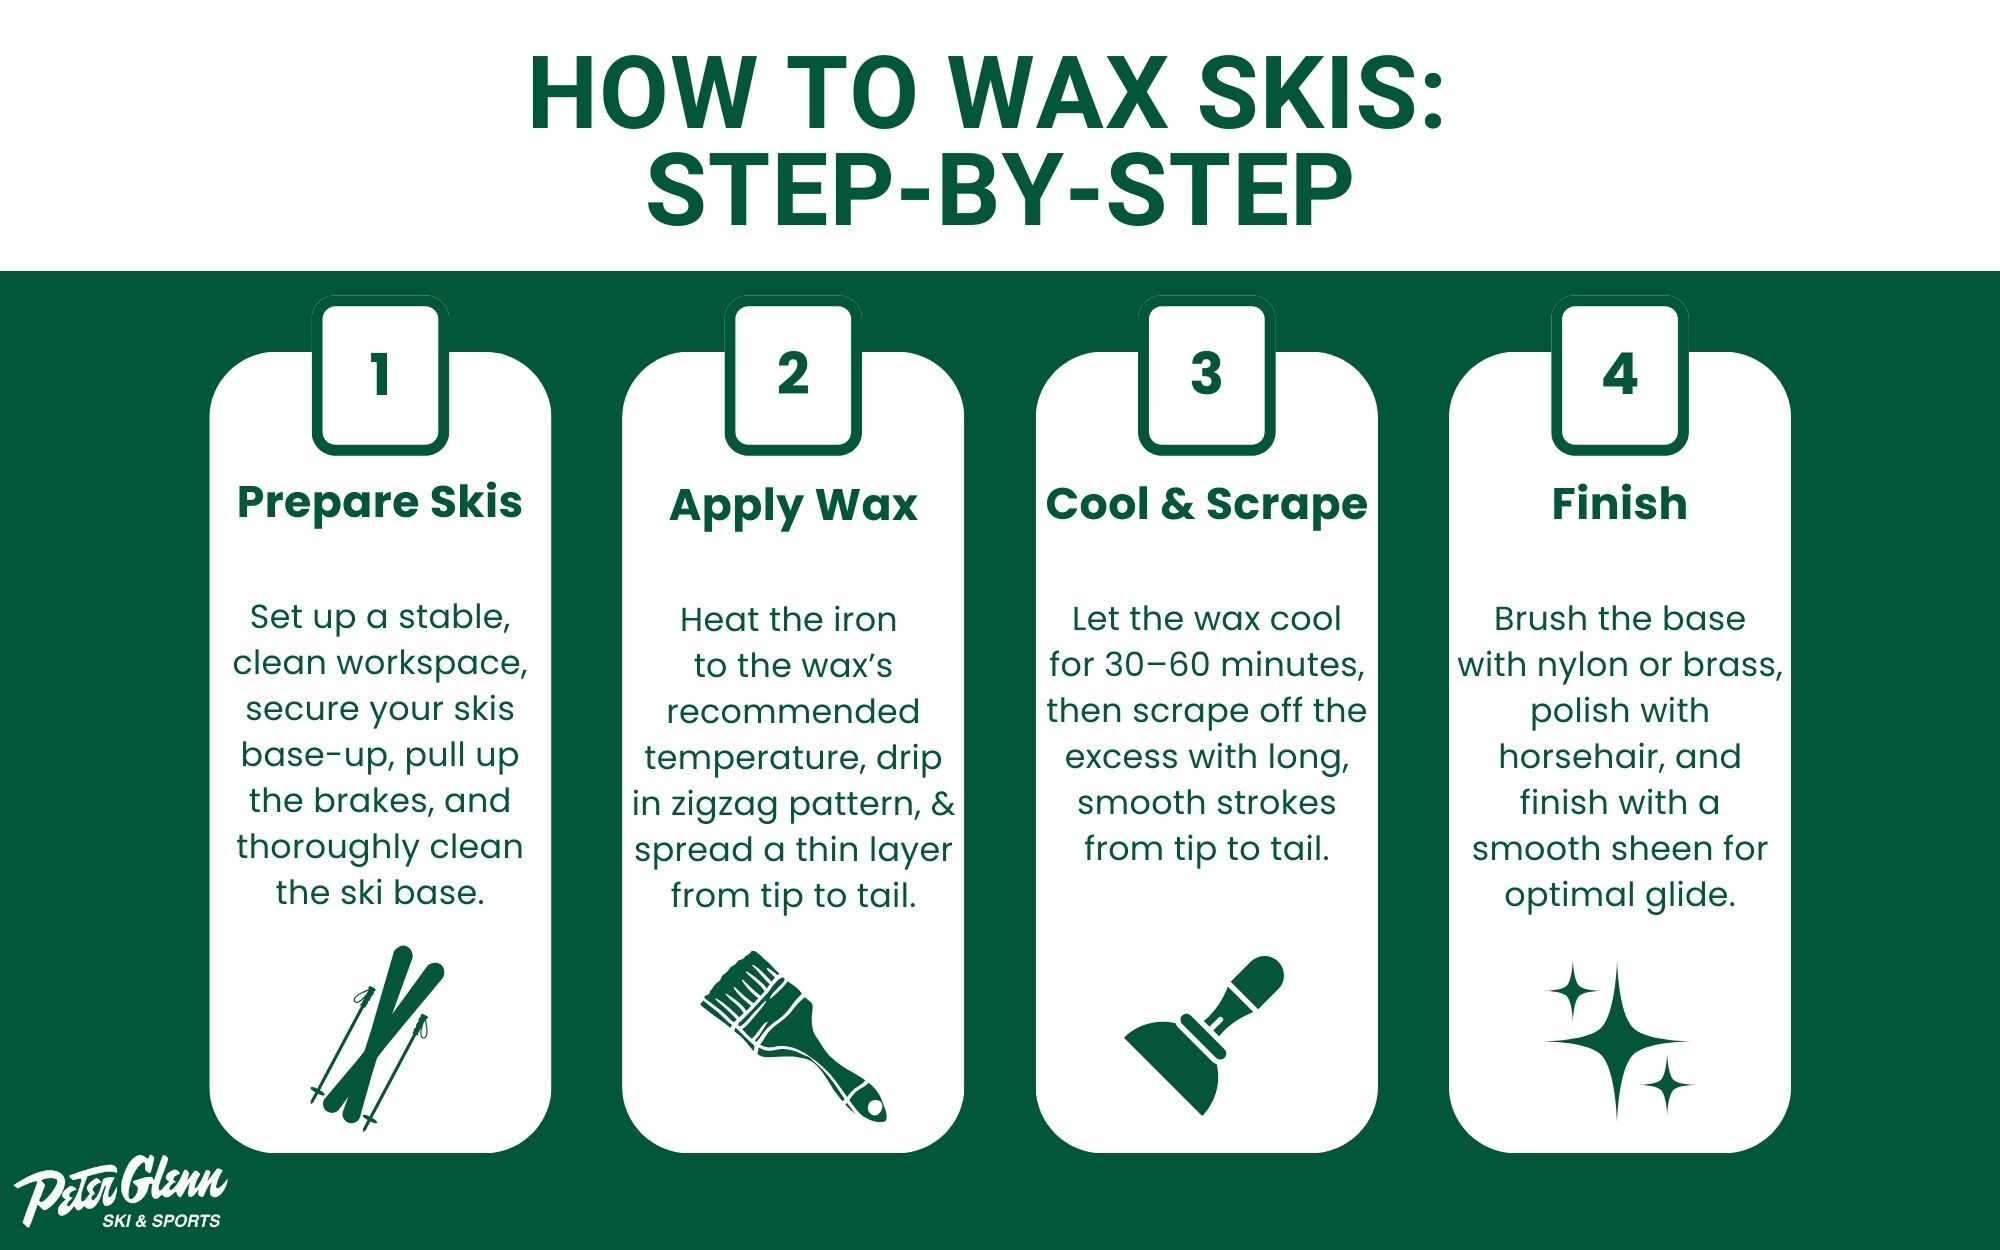
Step 1: Preparing Your Skis
Successful waxing begins with proper preparation. Start by setting up a clean, well-lit workspace with plenty of room to move. Secure your skis base-up on a stable surface like a ski vise or a sturdy table covered with a protective cloth. Use rubber bands to pull up ski brakes, preventing them from getting in the way during the waxing process.
Cleaning the ski base is perhaps the most critical step many skiers overlook. Years of skiing can leave behind dirt, old wax, and debris that prevent new wax from penetrating properly. Use a nylon brush to remove loose dirt, then apply a base cleaner or rubbing alcohol to strip away any remaining old wax. Work carefully, ensuring you clean the entire ski base thoroughly but gently.
Step 2: Wax Application
Temperature control is everything when it comes to waxing. Your waxing iron should be set to the specific temperature recommended for your chosen wax. Most wax manufacturers print temperature guidelines directly on their packaging. Hold the iron about an inch above the ski base, moving slowly and steadily.
Key steps for perfect wax application include:
- Drip wax in a consistent zigzag pattern
- Move the iron slowly from tip to tail
- Maintain a steady, even speed
- Avoid staying in one spot too long
The goal is a thin, even layer of wax that completely covers the ski base. Too much wax wastes product and creates unnecessary work during scraping. Less wax won't provide adequate protection and glide. Watch the wax melt and spread, creating a smooth, uniform coating that slightly overlaps the ski's edges.
Step 3: Cooling and Scraping
Patience is crucial during the cooling process. Let the waxed ski sit at room temperature for 30 to 60 minutes. This allows the wax to fully penetrate the ski base material, creating a protective layer that improves glide and reduces friction. Rushing this step can compromise your entire waxing effort.
When the wax has completely cooled, use a plastic scraper to remove excess wax. Hold the scraper at a 45-degree angle and apply consistent pressure. Always scrape from tip to tail using long, smooth strokes. The goal is to remove the surface layer while leaving wax deep in the ski base's pores.
Step 4: Finishing Touches
Brushing transforms a good wax job into a great one. Start with a stiff nylon or brass brush to remove most of the excess wax. Use long, consistent strokes from tip to tail. Follow up with a softer horsehair brush to polish the base and reveal its natural structure.
Final brushing tips:
- Use consistent, full-length strokes
- Work from tip to tail
- Create a smooth, glossy finish
A perfectly waxed ski should feel smooth and have a subtle sheen. Take your time with each step, and you'll notice a significant improvement in your ski's performance on the snow.
Ski Waxing Frequency, Safety, and Other Tips
Why Let the Pros Handle Ski Waxing?
While DIY waxing is rewarding, there are times when leaving it to the experts makes sense. Professional ski technicians bring three major advantages.
-
Precision: Pros have the right equipment and years of experience, ensuring wax is applied evenly and at the correct temperature for your skis.
-
Customization: A technician can match wax to exact snow conditions, temperature, and your skiing style for maximum performance.
-
Time & Safety: Save yourself the setup, cleanup, and risk of overheating your skis with too-hot irons or incorrect technique.
At Peter Glenn, we offer professional ski waxing services in-store. Our expert staff will make sure your skis are tuned, waxed, and ready for the slopes, so you can spend more time skiing and less time worrying about maintenance.
Staying Safe During Ski Waxing
Ski waxing involves working with heat and chemicals, so safety should always be your first priority. Always wax in a well-ventilated area to avoid inhaling potentially harmful wax fumes. Open windows or work in a space with good air circulation. Wear protective clothing, including long sleeves and gloves, to prevent skin contact with hot wax or cleaning solutions.
How Often Should You Wax Your Skis?
Waxing frequency depends on several factors, including your skiing intensity and snow conditions. Casual skiers might need to wax every 3-5 days of skiing, while competitive or frequent skiers could require waxing after each day on the slopes. Watch for these signs that your skis need waxing:
- Dry or white-looking ski base
- Reduced glide performance
- Visible base wear or damage
Choosing the Right Wax for Different Conditions
Snow conditions vary dramatically, and your wax should match. Alpine skis and cross-country skis require different waxing approaches. All-temperature wax works well for recreational skiers who don't want to swap wax frequently. More serious skiers use specialized wax for different snow temperatures and conditions.
Different types of wax to consider:
- Hydrocarbon wax for basic protection
- Liquid wax for quick touch-ups
- Temperature-specific wax for colder conditions
Competition Waxing Standards
Competitive skiing has strict rules about equipment preparation. The International Ski Federation (FIS) sets specific guidelines for waxing in professional competitions. While amateur skiers don't need to follow these exact standards, understanding competition rules can provide insights into professional-level ski maintenance.
Maintaining Your Ski Investment
Regular maintenance goes beyond just waxing. Consider a professional tune-up once or twice a season to reset base edges and structure. Invest in quality ski boots and gear to complement your waxing efforts. Proper storage during the off-season can also help extend the lifespan of your skis.
Waxing might seem like a chore, but it's an essential part of ski maintenance. A well-waxed ski performs better, lasts longer, and provides a more enjoyable skiing experience. Take the time to care for your skis, and they'll reward you with smooth, fast runs all season long.
Get All Your Ski Gear from Peter Glenn
Mastering ski waxing takes practice, patience, and the right equipment. From understanding snow conditions to selecting the perfect wax, you've learned the essential skills to keep your skis performing at their best. Whether you're a casual weekend skier or a dedicated alpine enthusiast, proper ski maintenance is key to an incredible mountain experience.
Peter Glenn offers everything you need to hit the slopes with confidence. Our expert staff can help you select the right wax, brushes, and tools for your specific skiing style. We carry top-quality ski gear, waxing equipment, and accessories from leading brands. Don't just dream about smooth, fast runs. Instead, make them a reality.
Shop skis, boots, jackets, and other clothing at Peter Glenn. Your perfect ski trip starts here!