How to Adjust Ski Bindings: Expert Tips & Safety Advice
Posted by Peter Glenn Staff on Oct 16th 2025
Table of Contents
At a Glance: Adjusting ski bindings involves a few key steps:
- Determine your correct DIN release setting
- Adjust the toe and heel pieces to fit your boot sole length
- Test the release and retention to ensure proper function
For safety and injury prevention, always have a certified ski technician perform these adjustments at your local ski shop.
Getting your ski binding setup right is one of the most important aspects of safe skiing. Improperly adjusted bindings can fail to release when needed or release too easily, causing injury or unexpected falls.
Understanding how skis are mounted and bindings are adjusted for new boots helps you know what to expect at the ski shop. This guide covers the fundamentals of ski binding adjustment, from understanding DIN settings to knowing when professional help is essential.
Understanding Ski Bindings Basics
Ski bindings connect your boots to your skis. They're designed to keep you securely attached during normal skiing while releasing during a fall to prevent injury.
The engineering behind modern bindings reflects decades of safety research by organizations like the Deutsches Institut für Normung (German Institute for Standardization), which established the DIN system still used today.
Main Components:
- Toe piece - Sits at the front of your boot and releases sideways during a twisting fall. It includes an anti friction device that allows smooth release and toe height adjustment mechanisms to accommodate different boot sizes.
- Heel piece - Holds the back of your boot and releases upward during forward falls. This component includes the adjustment screw for setting boot length and controls forward pressure against your boot sole.
- DIN setting - The numerical value that determines binding release force. This setting appears on both the toe and heel pieces and must match for proper function.
Types of Bindings
Alpine bindings are the standard for downhill skiing. Brands like Tyrolia binding systems use the DIN scale and are designed for ski boots with specific sole length measurements.
Touring bindings allow the heel to lift for uphill travel. They're built lighter for backcountry use.
When Adjustments Are Needed
You'll need binding adjustments in several situations:
- Getting a new boot or if your boot sole length has changed
- Passing skis between different users
- At the start of each ski season
- After changes in body weight or skiing experience
- When your ability level improves significantly
Experienced skiers know regular binding checks are essential.
Determining Your DIN Setting
The DIN system, developed by the German Institute, standardizes release settings across all binding manufacturers. Your DIN release setting is calculated using specific factors to balance security while skiing with appropriate binding release during falls.
Factors Affecting DIN Value:
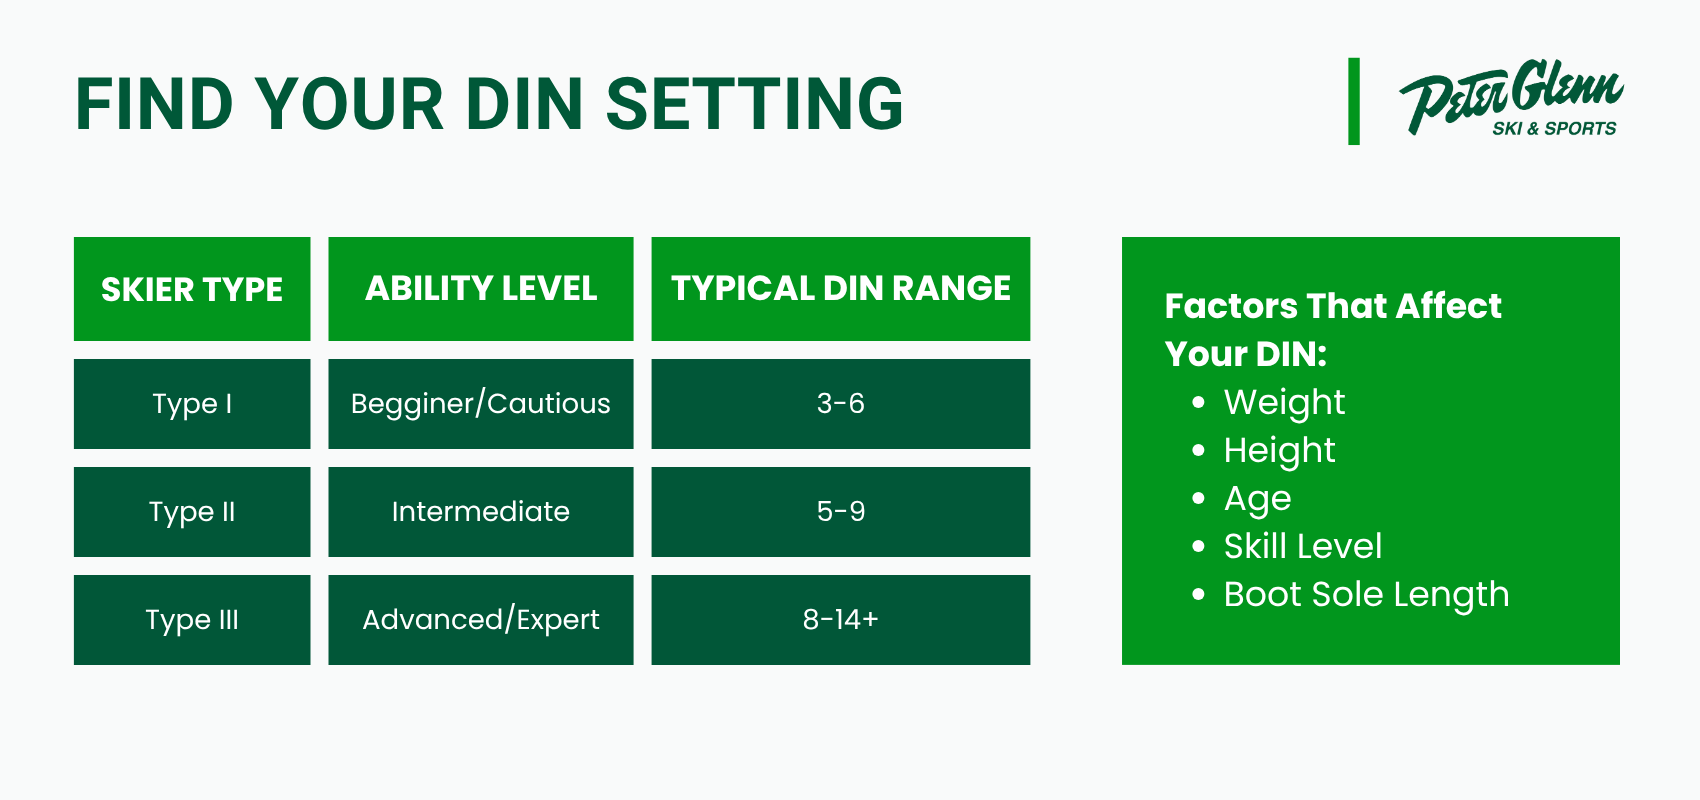
Weight is the primary factor. Heavier skiers require higher DIN settings because greater force is needed to separate them from their skis during a fall.
Height influences leverage. Taller skiers create longer lever arms, affecting the forces applied to bindings.
Age matters because bone density and injury recovery change over time. A female skier over 50, for example, typically uses lower release settings than younger skiers of the same weight and skill level.
Skill level significantly impacts your DIN. Expert skiers who make aggressive turns at higher speeds need higher settings to prevent unwanted release. An experienced skier rated as Type III aggressive will have higher DIN values than a cautious Type I beginner.
Boot sole length affects the calculation because it changes the mechanical advantage in the binding system.
Using DIN Charts
Every ski shop uses standardized DIN calculator charts that cross-reference these factors. These charts typically show:
- Type I skiers (cautious, lower speeds): DIN 3-6
- Type II skiers (moderate ability level): DIN 5-9
- Type III skiers (aggressive expert skiers): DIN 8-14+
A beginner might use DIN 4-5. An advanced skier of similar size could require DIN 9-11. Professional racers sometimes exceed DIN 15.

Safety Considerations
Never set your DIN higher than recommended hoping for better control. Higher settings won't improve your skiing but will dramatically increase your risk of injury by preventing necessary release during falls.
Similarly, setting DIN too low causes frustrating pre-releases during normal skiing. Always consult a certified technician who can properly assess your needs.
Step-by-Step Adjustment Process
The following explains what technicians do, but adjustments should only be performed by certified ski techs with proper tools.
Tools Needed:
- Screwdriver set
- Binding testing equipment
- Boot sole length measurement tools
- Official DIN charts
- Torque wrenches (for mounting)
Preparing Your Workspace
Clean the ski base and binding area thoroughly. Dirt or ice can interfere with measurements and prevent proper boot seating.
Toe Piece Adjustment
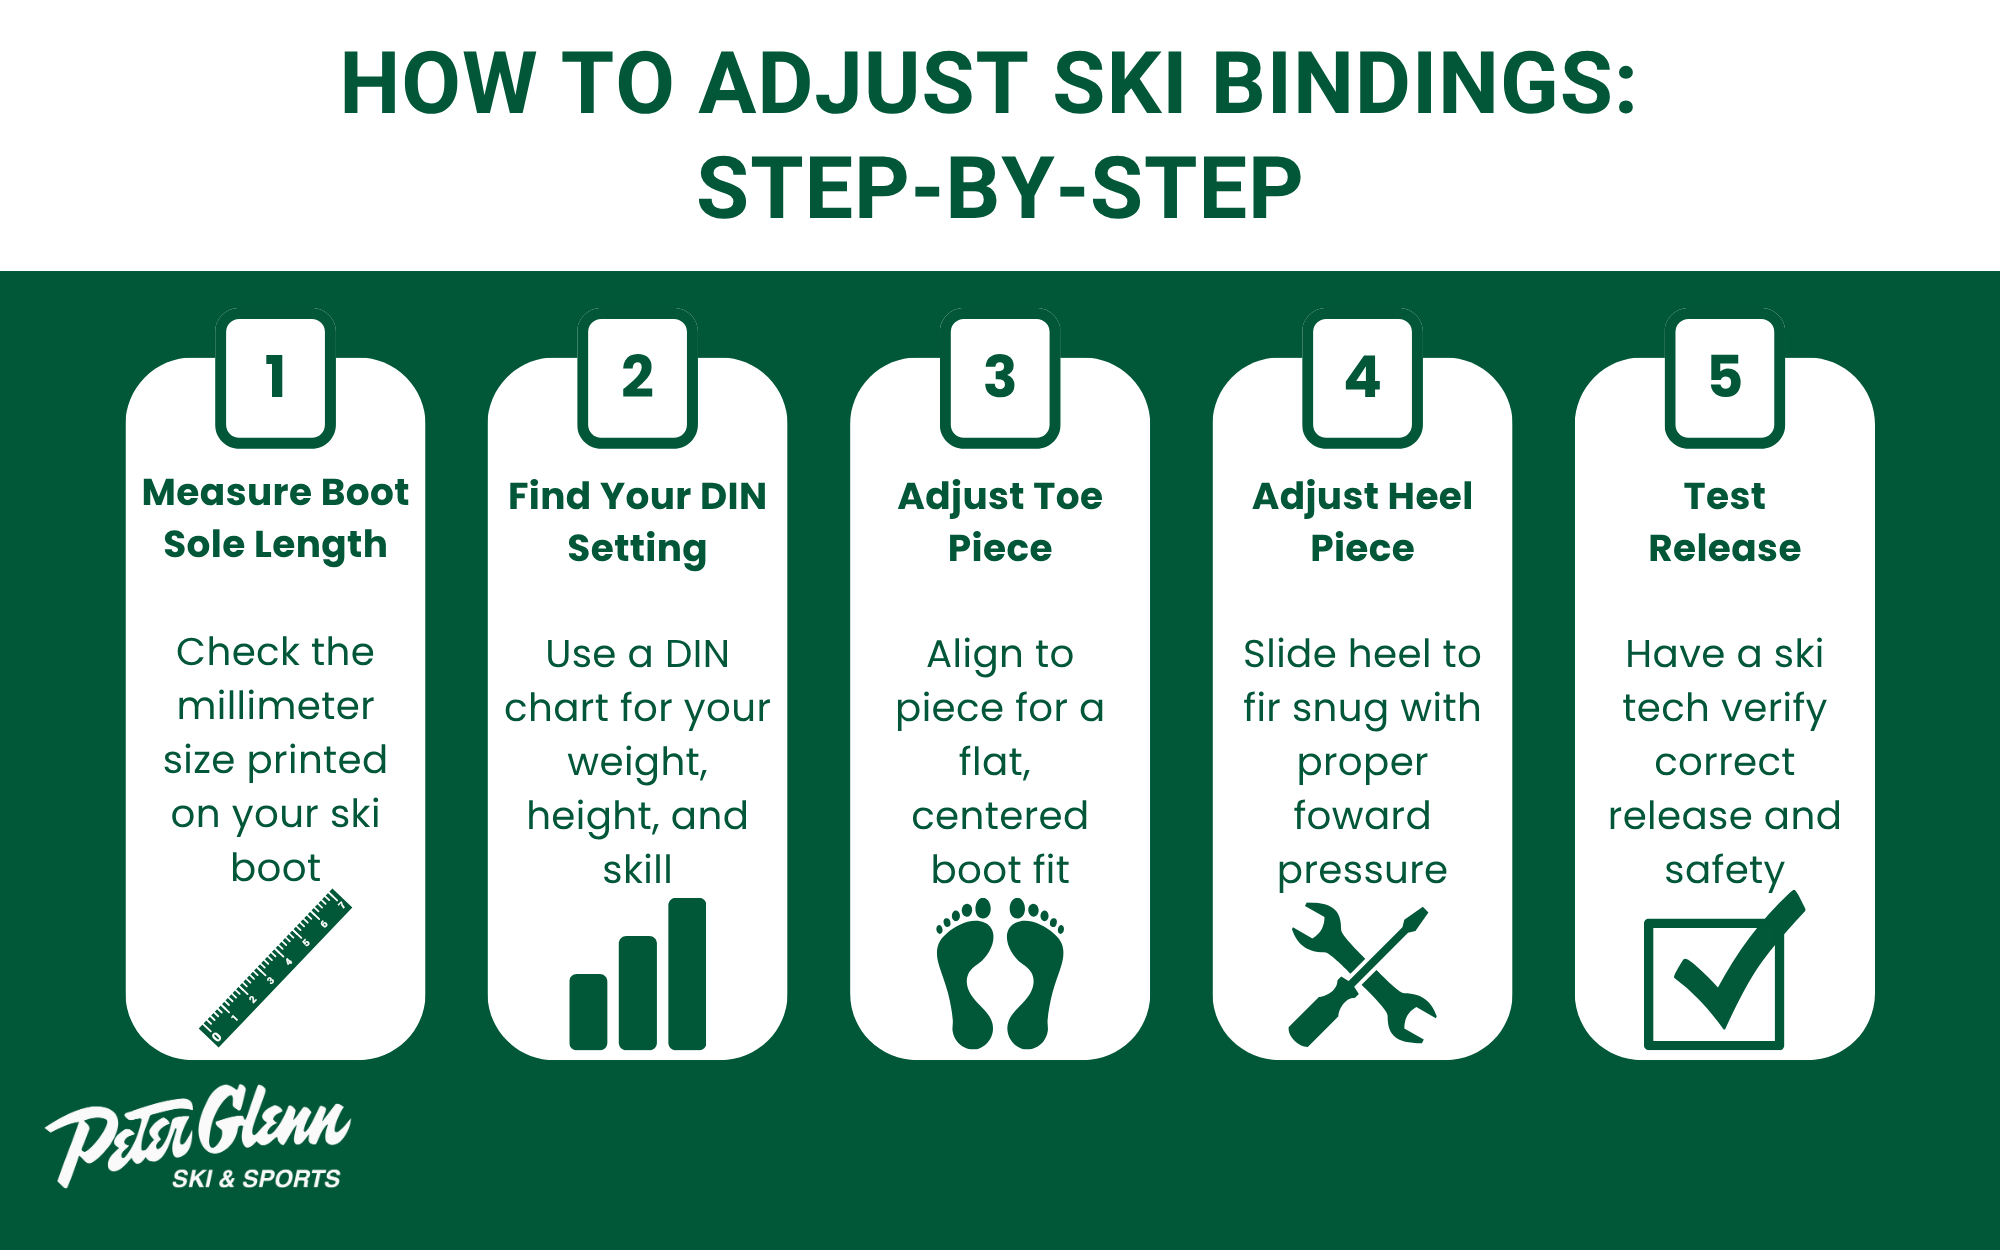
Setting forward pressure ensures the boot sits correctly in the binding. The technician adjusts the toe piece position so the forward pressure indicator shows the correct range when the boot is fully inserted.
This adjustment is critical. Incorrect forward pressure can cause binding malfunction regardless of DIN setting.
The boot should center evenly in the toe piece and sit flat against the anti-friction device.
Testing release involves controlled force applied by specialized equipment. The binding should release at the set DIN value, not before or after.
Heel Piece Adjustment
Setting boot length involves loosening the adjustment screw on the heel piece and sliding it to match your boot sole length. Most bindings have measurement windows or marks indicating proper positioning.
The technician checks alignment to ensure the heel piece closes completely. The boot sole must sit flush against the heel contact points. Any gap indicates incorrect adjustment that could affect release function.
The heel piece must release upward at the correct force. Like the toe piece, this requires calibrated testing equipment to verify.
Testing Binding Function
After adjustments, technicians test both lateral and upward release multiple times. They verify:
- The boot clicks securely into place
- All release mechanisms function smoothly
- No binding or catching occurs during release
- Release happens at the correct DIN value

Safety Tips and When to Seek Professional Help
Proper binding adjustment is not optional. It's essential for your safety on the mountain.
While understanding the adjustment process is valuable, actually performing these adjustments requires certification and specialized equipment.
When to Visit a Professional:
- Any binding work, including new ski setup or switching boots
- Adjusting DIN settings for changes in skiing ability
- Annual binding check before ski season
- After summer storage to ensure proper function
- If you experience unexpected releases or failure to release (stop skiing immediately)
Regular Maintenance
Keep bindings clean and free of ice buildup throughout the ski season. Check that screws remain tight. Store skis in a dry location to prevent corrosion that can affect binding release mechanisms.
Get Your Ski Equipment at Peter Glenn
With over 65 years in the ski industry, Peter Glenn offers a wide selection of ski equipment, including new ski options, ski boots, bindings, and gear from top brands like Tyrolia binding systems and more.
Visit Peter Glenn to find everything you need for the ski season. Our knowledgeable staff can help you select the right equipment for your ability level and skiing experience.


